Tuesday, October 19, 2010

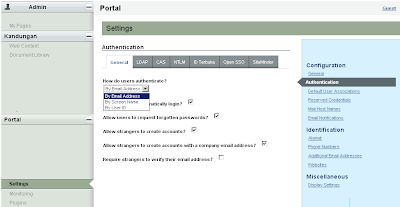
How to set user authenticate in liferay?


There are three types of user authentication in Liferay.
By Email
By Screen Name
By User ID

By default, user authentication setting is 'By Email Address'.

To change this setting, login as portal Admin.
Click Control Panel. And choose Setting >> Authentication >> General.

Then choose the answer either 'By Screen Name' or 'By User ID'.

Next, click 'Save'.

Monday, September 6, 2010

My content too long, how to break page?

My content is too long. Then I need to break them into more than a page.

So just add @page_break@ to do it.


The result shown below.

Wednesday, August 11, 2010

Set dwilanguage for portlet title

In this example, I use Bahasa (Malay language) and English.

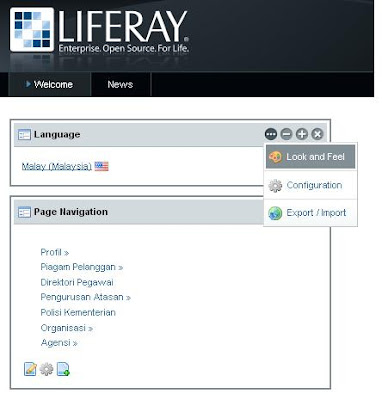
To set value for each language, we can customize the value in Look and Feel part.
Step 1: Click icon Look and Feel in the portlet header.


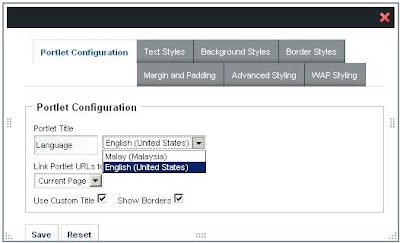
Step 2: Click tab Portlet Configuration, check box Use Cutom Title. Then define portlet title to appropriate language.


Step 3: Save.

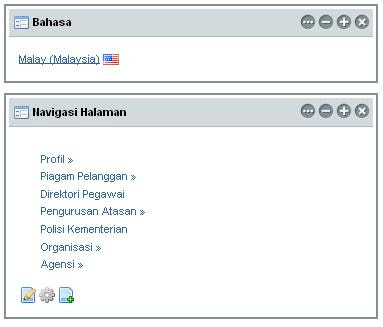
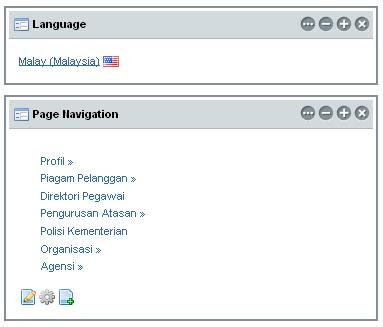
Then results shown below.
a) Bahasa (Malay language)


b) English.

Thursday, June 10, 2010

How to embed portlet in theme? Part 1

Liferay version: 5.2.3

Embedding portlet in theme means we want to put coding in velocity files. For example, I need to embed last update portlet in a velocity file named as footer.vm.

There are three steps.
1.Install portlet using Plugin Installer. Go to Control Panel > Plugin Installer > Install more portlet > Upload file. The .WAR file for last update can be downloaded here.
2.Set the instanceable properties to false. Path: ~/server/tomcat-6.0.18/webapps/last_update-portlet/WEB-INF/liferay-portlet.xml

3.Get the portlet ID. Then put this code, $theme.runtime(“portlet_ID”)


For this example, $theme.runtime("lastupdate_WAR_last_updateportlet")
Result:


Click image to enlarge. The last update status appear in the last line.

Monday, May 24, 2010

UBUNTU: ./catalina.sh: 357: not found

Problem.

error: ./catalina.sh: 357: not found
Solution: Set the path for JAVA_HOME and JRE_HOME.

First, check java version. Command line: java -version
You will get this: java version "1.6.0_20"
In case java version not equal to the value as in this example, please replace
that according to your java version.

sudo vi catalina.sh

Press key Insert
Just add these two lines.

JAVA_HOME="/usr/lib/jvm/java-sun-6-0.20/bin"
JRE_HOME="/usr/lib/jvm/java-sun-6-0.20/jre"

Then press key Esc
:wq!

Note: :wq! is to quit and save.

Friday, May 21, 2010

Liferay: How to switch language

To localize the language, we configured in portal-ext.properties.
The properties for language is set as shown below.

#limit the language selection.
locales=en_US,ms_MY

I need to create a bilanguage portal. For instance at least a user can choose either to read English or Bahasa or France.
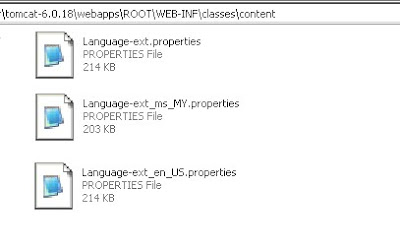
The only file that control language properties is language.properties. For additional terms, we can use Language-ext_en_US.properties and Language-ext_ms_MY.properties. In liferay Community Edition, we can put these files (Language-ext_en_US.properties and Language-ext_ms_MY.properties) in ~/tomcat-6.0.18/webapps/ROOT/WEB-INF/classes/content.
The extend properties depends on languages to be used in portal.

Every places in portal need to be switched will functions as the follows.
1. Journal content will be written using FCK Editor.
2. Theme (template & layout), portlet can be configured in Language-ext_xx_YY.properties files. In my example, xx_YY are en_US and ms_MY.

For the second part above, language's switch identifier generally in this form; #language("any_term_to_change"). Let say we need to apply this to banner. So we write #language("portal.banner"). Then we translate banner term in Language-ext_xx_YY files.

Thursday, May 20, 2010

Liferay: How to add more than one layout?

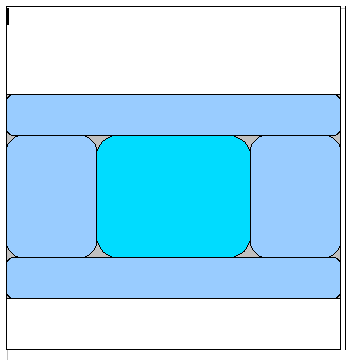
I created template layout using plugIns SDK. Then ant inserted myportal-layouttpl with first layout with 1-3-1 (three rows with three columns for the second row). I renamed this template layout as 'mainpage'.

But for certain page, I need another layout style, let say 1-2 (two rows where the second row has two columns). The second template named as 'subpages'.


This layout TEMPLATE not included bottom part since footer part already included in portal_normal.vm.

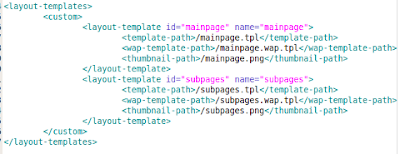
The colored parts in the figure technically written in 1-3-1.tpl (main_page) and 1-2.tpl (subpages). The second layout template can be added like this;
Open liferay-layout-template.xml : Path ~/plugins/layouttpl/myportal-layouttpl/docroot/WEB-INF
Add this before custom tag.


Then do not forget to do ant deploy.

Liferay: Understanding the theme (Part 2)

4. portlet.vm
This velocity file tell us how a standard portlet would be included in portal. It is inserted through $theme.wrapPortlet("portlet.vm", $content_include)
in portal_normal.vm

To decorate theme, we can customise css. Maybe note on css in previous entry can help for further information.

Now we understand yet template. Inside template, there is layout template. By default, bundle Liferay comes out with classic template.
This layout template can be referred in /tomcat-6.0.18/webapss/ROOT/layouttpl/custom

Wednesday, May 19, 2010

Liferay: Understanding the theme (Part 1).


Liferay 5.2.3
--------------------------
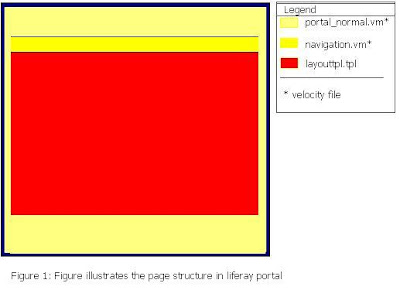
There are a group of velocity files for template named as portal_normal.vm (core file), navigation.vm, dock.vm, init_custom.vm.
1. init_cutom.vm
In this file, we can declare all variables in portal_normal.vm
Example:
#set ($theme_name = "myportal-theme")
#set ($the_title = "Official Web")
#set ($company_name = "MySolution.Net")
#set ($company_url = "http://www.mysolution.net")

2. portal_normal.vm
This is the core / main frame for template. It can accept other velocity files with this form : #parse ("$full_templates_path/any_velocity_file.vm")
Let say we need to include accessibility part which contains functions to personalisation (change color, font size).
So we can write script for it and name the file as accessibilty.vm
To include the file in portal_normal.vm we just add a line likes #parse ("$full_templates_path/accessibility.vm")

3. navigation.vm
The default setting only allow developer develop single page. That means no children page will be passed even if there were children pages added. This is an example script navigation.vm for three layers (main page have three children pages).

Tuesday, April 20, 2010

Customise language in Liferay Portal.

This documentation done based on Liferay 5.2.3, tomcat-6.0.18.

In our portal, we need to use two languages. Malay as Primary and English secondary language.
To localise the language, we configured in portal-ext.properties.
The properties for language is set as shown below.

#limit the language selection.
locales=en_US,ms_MY

Since Malaysia flag icon not available, we need to add the 16 x 11 icon image in
~/tomcat-6.0.18/webapps/portal-theme/images/language
manually.

It means that when we use language portlet, only two flags will appear in the porlet. We also can put the flag icon in portal theme.
Just use $theme.language() to be wrote in our template [by writing it in portal_normal.vm].

Output:

Monday, April 12, 2010

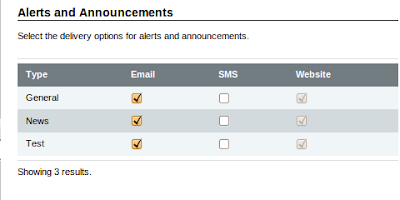
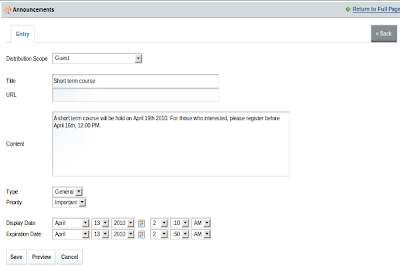
Email Notification for Announcements portlet.

Configure users setting.
Go to Control Panel > Users

Edit users with assigning them Guest community, and Announcement.

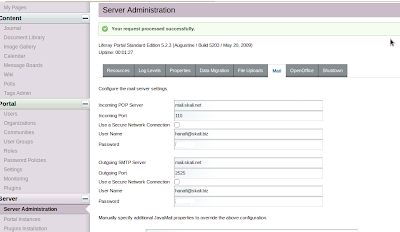
Configure Server Administration (Control Panel > Server Administration)

For outgoing port, use port 2525

Then add this properties in portal-ext.properties
announcements.email.from.address=webmaster@mysolution.net
announcements.email.from.name=Webmaster

Problem statement and Solution

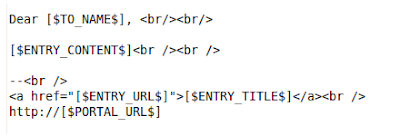
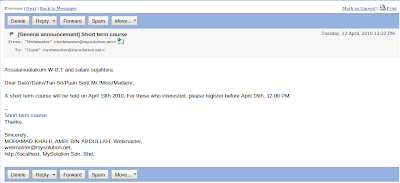
The current email_body.tmpl is very simple.


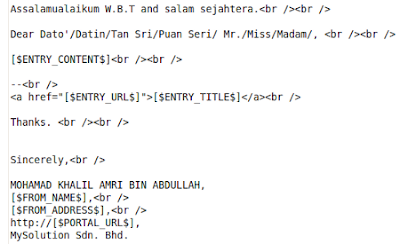
Sometimes, we need to modify it so that the message becomes formal (Official).
Example,


How to modify email_body.tmpl in Announcements portlet?

In liferay Enterprise Edition (Liferay EE), email_body.tmpl located in folder dependencies.
Path: ~/html/portlet/announcements/WEB-INF/classes/com/liferay/portlet/announcements/dependencies

For those who use liferay Community Edition (Liferay CE), this file can be found in liferay-portal-src-5.2.3
Path: liferay-portal-src-5.2.3/portal-impl/src/com/liferay/portlet/announcements/dependencies

Then we need to do ant deploy in ext-impl. Copy email_body.tmpl and paste in ~/ext/ext-impl/src/com/liferay/portlet/announcements/dependencies
Notes that we need to create folders announcements and dependencies if they not existed.

Go to ~/ext/ext-impl
Then run command: ant deploy

Testing an announcement.

1. Add annoucement portlet in admin page (or any page).
2. Write your announcement.


Output


Monday, March 8, 2010

CSS sprite example: Two rows images.

The iconic button given is;


Grid view for image above.

Result:

HTML code;


CSS style in custom.css

/*~~~~~~~~~~~~~~~~~~~~~~~CSS_sprite~~~~~start~~~~~~~~~~~~~~~~~~~~~~~~~~~~~~~~~*/
ul#sprite_footer{
margin:0 -29px;
width:928px;
height:196px;
}
ul#sf_row_1 li a{
height:110px;
}
ul#sf_row_2 li a{
height:86px;
}
ul#sf_row_1 li a,ul#sf_row_2 li a{
background:url(../images/button_image.png) no-repeat;
display:block;
border:none;
padding:0;
text-indent:-9999px;
}
#sf_row_1 li, #sf_row_2 li{
float:left;
display:inline;
}
#sf_row_1 li a,#sf_row_2 li a{
margin-right:-40px;
}
#sf_row_1 li a#button_1_1{
background-position:0px 0px;
width:218px;
}
#sf_row_1 li a#button_1_2{
background-position:-218px 0px;
width:167px;
}
#sf_row_1 li a#button_1_3{
background-position:-385px 0px;
width:165px;
}
#sf_row_1 li a#button_1_4{
background-position:-551px 0px;
width:166px;
}
#sf_row_1 li a#button_1_5{
background-position:-718px 0px;
width:212px;
}
#sf_row_2 li a#button_2_1
{
background-position:0px -110px;
width:206px;
}
#sf_row_2 li a#button_2_2
{
background-position:-206px -110px;
width:144px;
}

#sf_row_2 li a#button_2_3{
background-position:-350px -110px;
width:130px;
}
#sf_row_2 li a#button_2_4{
background-position:-480px -110px;
width:150px;
}
#sf_row_2 li a#button_2_5{
background-position:-630px -110px;
width:110px; }
#sf_row_2 li a#button_2_6{
background-position:-740px -110px;
width:188px;
}
/*~~~~~~~~~~~~~~~~~~~~~~~CSS_sprite~~~~~finish~~~~~~~~~~~~~~~~~~~~~~~~~~~~~~~~*/

Sunday, March 7, 2010

Understanding CSS in liferay.


By default, CSS styles in liferay can be found in folder /css. Bundle liferay with Classic theme means that css folder path: ~/tomcat-6.0.18/webapps/ROOT/html/themes/classic.


There are few css styles file. Main css (main.css) located all styling files from the lowest to highest (in term of priority) from top to bottom.


Let say, I want to add a new css file (e.g mystyle.css). I must import this file in main.css – add this new line @import url(mystyle.css); - the styles in this new file will overwrite all styles in other files above it. For a standard practice, custom.css has the highest priority.


Sometimes, new developer understood this thing but when doing some customization in custom.css nothing changes. Why? It is because the server not refers to that changes. When developer inspected the element using firebugs, the css style reference maybe main.css or base.css only. How to overcome this problem?


For development purpose only, developer must add new properties in portal-ext.properties (/webapps/ROOT/WEB-INF/classes). The properties are shows as the following.


## FOR DEVELOPMENT PURPOSE, NEED TO REMOVE
##AT PRODUCTIONS ##


## Set this property to true to load the theme's merged CSS files
##for faster loading for production.

##

## Set this property to false for easier debugging for development.
##You can also disable fast loading by setting the
## URL parameter "css_fast_load" to "0".

theme.css.fast.load=false

##

## Set this to flase to disable the display of CSS logging.

##

theme.images.fast.load=false

##

## Set this property to true to load the packed version of
##files listed in the properties "javascript.barebone.files" or

## "javascript.everything.files".

##

## Set this property to false for easier debugging for development.
##You can also disable fast loading by setting the
## URL parameter "js_fast_load" to "0".

##

javascript.fast.load=false

##

## Set this to true to enable the display of JavaScript logging.

##

javascript.log.enabled=true

##

## Setting it to false is useful during development if you need
##to make a lot of changes.

layout.template.cache.enabled=false

##

## Disable Liferay from opening a new browser window
##everytime start the server

##
browser.launcher.url=
##

## Last Modified

##

## Set this to true to check last modified date on server side CSS and

## JavaScript. On Development purpose just set it false

##

last.modified.check=false

##

## Enabling OpenOffice integration allows the
##Document Library portlet and the Wiki
##portlet to provide conversion functionality. This is tested with
## OpenOffice 2.3.x and 2.4. To start OpenOffice as a service,
##run the command:

##

## soffice -headless -accept="socket,host=127.0.0.1,port=8100;urp;"

##

openoffice.cache.enabled=false

##

## Set the Velocity resource managers. We extend the
##Velocity's default resource managers for better scalability.

##

velocity.engine.resource.manager.cache.enabled=false

##

## The cache filter will cache content. See ehcache.xml to modify the cache

## expiration time to live.

##

com.liferay.portal.servlet.filters.cache.CacheFilter=false


##

## The theme preview filter generates a preview of the currently applied

## theme that can be used by the Dreamweaver Theming plugin.
##This is disabled by default.
##Set the "themePreview" parameter to "1" in the URL to access

## the theme preview for any page. For example, a URL can be

## http://localhost:8080/web/guest?themePreview=1.

##

com.liferay.portal.servlet.filters.theme.ThemePreviewFilter=true

Thursday, March 4, 2010

CSS sprite in liferay

I have six images, arranged in a row. I call these images one by one in theme. But it will increase the HTTPRequest value.

CSS Sprite technique is a way to reduce HTTPrequest by combining images and then adjust the position value for each image. It can be in horizontal (X-axis) or vertical (Y-axis).

Before using CSS sprite, the coding[2] for that images may be look like this;

And the CSS style looks like this;

After applying CSS sprite....
In this tutorial, I combined six images and named it as button.png.
I restructured my codes as shown below.


And the CSS style looks like this;

The output:


If your button image in vertical, just adjust the Y-axis in background-position (e.g background-position:0px, -70px).


Note: Click on image to enlarge.

1. CSS style is written in custom.css
2. Coding in this entry located in portal_normal.vm

Thursday, January 28, 2010

MySQL: How to fix ERROR 1153 (08S01)

How to fix ERROR 1153 (08S01): Got a packet bigger than 'max_allowed_packet' bytes

Mysql Server Version: MySQL-server-community-5.1.41
OS: Open Suse 11.0 (server)

I tried to dump my database to mysql and got the error as stated in entry's title above.
The default value for max_allowed_packet is 1048576 (1M). The available range for it is between 1024 to 1 073 741 824.


Firstly, I think can edit the value by using command line when I signed in to mysql.
myserver:/etc/init.d # mysql -u root -p

mysql> SET @max_allowed_packet = '16M';
(Let say I want to increase the value to 16M).

But I got nothing, 0 row affected.
Ok, just exit from mysql.

Then open file mysql under directory /etc/init.d
vim /etc/init.d/mysql
I just pasted the excerpt from mysql file.
# If you want to affect other MySQL variables, you should make your changes

# in the /etc/my.cnf, ~/.my.cnf or other MySQL configuration files.

Then just create a file and name it as my.cnf inside /etc.
To make my life easy, I just copied[1] mysql file and then renamed[2] it as my.cnf
Then edit[3] my.cnf file.

[1]myserver:/etc/init.d # cp mysql /etc
[2] myserver:/etc/init.d # mv mysql my.cnf
[3] myserver:/etc/init.d #gedit my.cnf

Just add these two lines:
[mysqld]
max_allowed_packet = 16M

Then save it.
Then restart[4] msql service
[4] myserver:/etc/init.d # ./mysql restart

Again, sign in to mysql, and type command
mysql> show global variables like 'm%'; (Refer to Figure 1)

Figure 1: Show global variable in mysqld.


The new value will appear in the first row. Other way to check it is by typing this command
myserver:/etc/init.d # mysql service status (Refer to Figure 2)


Figure 2: An alternative method to look at variables set in mysqld.
Monday, January 11, 2010

Linux: Cannot find ./catalina.sh

Subject: Liferay Development Troubleshooting 1

Problem: Cannot find ./catalina.sh
OS: Ubuntu 9.04

Descritption
Cannot start tomcat sever with error 'Cannot find ./catalina.sh'. Refer to Figure 1 below

Figure 1: Cannot start tomcat server.


Solution

Make sure file permission to all files in bin (../tomcat-6.0.18/bin) directory can be executed.
Default mod: -rw-r--r--; means that the file can be read only.

Back to server directory, command line: cd ../../
Then change the file mode command line: sudo chmod 755 -R tomcat-6.0.18/*

Sunday, January 10, 2010

Applying Accordion Function in Liferay.

Liferay Version: 5.2.3


This example refers to the accordion in this page.


The normal javascript looks like


To make it works in liferay environment, just adjust some codings for javascript.
The new coding is shown as below


Result:


To make it prettier, just edit the CSS.

Live demo for accordion in Liferay.