Problem: Forgot the password to login mysql.
Solution: Need to reset password.
First, just take few minute checking the default password in file debian.cnf
Command line: sudo gedit /etc/mysql/debian.cnf
Then type this command;
mysql -u debian-sys-maint -p
Enter password:
*Please enter the password stated in the debian.cnf
Then when you logged-in,
mysql >
Type the command to set new password.
Mysql > SET PASSWORD for 'root'@'localhost'= 'my_new_password';
exit.
Then test the new password.
mysql -u root -p
Enter password: my_new_password
---------------------------------------------------
Have a nice day!
Tuesday, October 20, 2009
Wednesday, October 14, 2009
UBUNTU 9.04: How to fix error - SSH connection refused?
OpenSSH is a freely available version of the Secure Shell (SSH) protocol family of tools for remotely controlling a computer or transferring files between computers.
If the openssh-server not installed yet, you will get error : openssh connection refused.
It is not about firewall disable.
When you cannot remote to the other PC or server in the network, just install OpenSSH-server. Use the command line below
sudo apt-get install openssh-server
--------
Good luck! Have a nice day.
Thursday, October 8, 2009
How to install nautilus SVN in Ubuntu 9.04
Client side for SVN
1. The video below is the tutorial for nautilusSVN.
1.1 Refer to this tutorial: Youtube Tutorial
How to install? Step by step.
2. According to a report, nautilusSVN already renamed as RabbitCVS.
Step 1: Go to www.rabbitcvs.org. ## install rabbitvcs
http://rabbitvcs.org/ and download the installer package: rabbitvcs_0.12-1~hardy_all.deb.
http://wiki.rabbitvcs.org/wiki/download
Step 2: Unpack the package.
sudo dpkg -i rabbitvcs_0.12-1~hardy_all.deb
Step 3: There is some missing package (ipython) that not installed. Then install ipython package.
sudo apt-get install ipython meld
Step 4: Solve this error :: E: Unmet dependencies.
sudo apt-get -f install
-------------
Note: Thanks to my friend, Wahid. -:)
Thursday, September 10, 2009
How to solve Error 2006 - mySQL server has gone away.
When I need to populate data into mysql database, I got this error; Error 2006 - mySQL server has gone away.
How to solve it?
....\xampp\mysql\bin
open my.cnf > drag the icon into Notepad

Then just change the value of max_allowed_packet. In my case, I set 600M.

Save. And restart mysql server.

How to solve it?
....\xampp\mysql\bin
open my.cnf > drag the icon into Notepad

Then just change the value of max_allowed_packet. In my case, I set 600M.

Save. And restart mysql server.

Tuesday, August 18, 2009
TortoiseSVN in PC
Objective
-to guide installation.
-to review how to commit a repository into working copy.
1. Download the installer from this site.
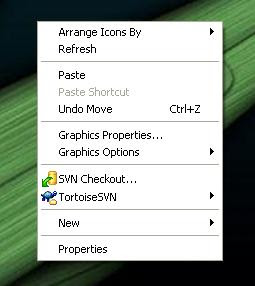
2.When installed, the new features in TortoiseSVN will appear when you pressed right-click on the Desktop.
3.Open the TortoiseSVN ---> Setting and activate the Use “_svn” instead of “.svn” directories checkbox.
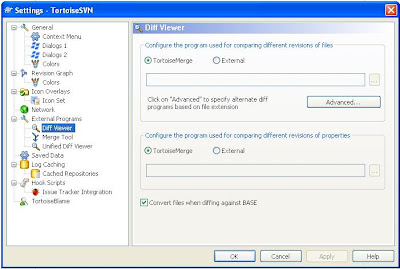
4.Choose the TortoiseMerge for Diff Viewer instead of External.

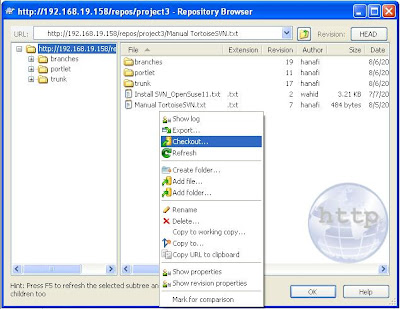
5. To link the TortoiseSVN to server, right-click → TortoiseSVN → Repo-browser. Key-in the
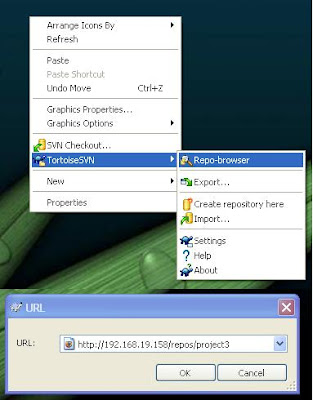
6.The repository browser will appear.
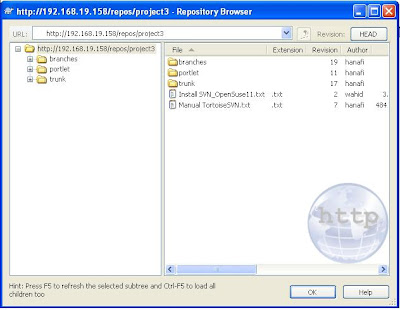
That means if you want to browse this repository using browser, you also can but need to be authorised first. This is because the svn authorization (permission) setting has been configured.
7. Firstly, the repository contain nothing, thus the svn manager must add new folder or files in the repository.
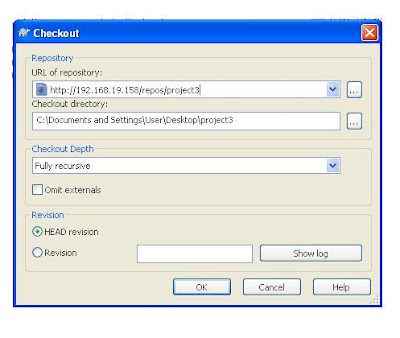
8. After that, these documents can be checked-out to the working copy in the PC. Just right-click the right column's repository windows. → Checkout.
9.Let say, my working copy is inside the project3 folder in Desktop.
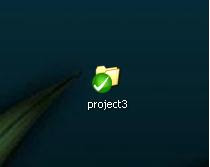
10. The working folder will have right mark; means that all documents are revised.
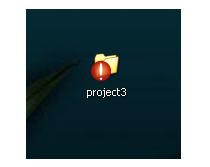
11.Otherwise, the red mark will appear. It means somebody already modified the file but not checkout yet. So we can know specifically which file being modified inside the working copy folder.
12.The incident in (11) above can be solved by committing the working copy. → Checkout → write the revision message.
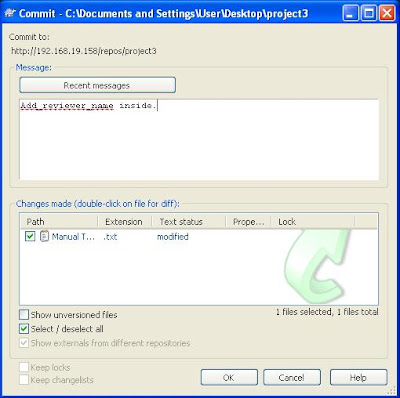
13.And finally you will receive the complete message if the revision success.
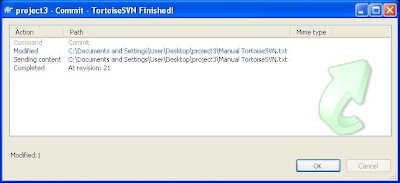
14.The revision number also changes when you check via browser.

----
Notes: The IP Address in this documentation cannot be accessed.
-to guide installation.
-to review how to commit a repository into working copy.
1. Download the installer from this site.
2.When installed, the new features in TortoiseSVN will appear when you pressed right-click on the Desktop.

3.Open the TortoiseSVN ---> Setting and activate the Use “_svn” instead of “.svn” directories checkbox.

4.Choose the TortoiseMerge for Diff Viewer instead of External.

5. To link the TortoiseSVN to server, right-click → TortoiseSVN → Repo-browser. Key-in the

6.The repository browser will appear.

That means if you want to browse this repository using browser, you also can but need to be authorised first. This is because the svn authorization (permission) setting has been configured.
7. Firstly, the repository contain nothing, thus the svn manager must add new folder or files in the repository.
8. After that, these documents can be checked-out to the working copy in the PC. Just right-click the right column's repository windows. → Checkout.

9.Let say, my working copy is inside the project3 folder in Desktop.

10. The working folder will have right mark; means that all documents are revised.

11.Otherwise, the red mark will appear. It means somebody already modified the file but not checkout yet. So we can know specifically which file being modified inside the working copy folder.

12.The incident in (11) above can be solved by committing the working copy. → Checkout → write the revision message.

13.And finally you will receive the complete message if the revision success.

14.The revision number also changes when you check via browser.

----
Notes: The IP Address in this documentation cannot be accessed.
Thursday, April 16, 2009
Clone virtual server.
Physical OS: Suse Linux Ent. 11.0 (SLES).
Virtual machine OS: OpenSUSE 11.0
This documentation is base on OpenSUSE 11.1
When you setup physical server, your system (in this case : xen), will built Domain-0. Inside Domain-0 you can insert virtual server as many as you wish. For the first virtual server, you must install by using CD or by getting it form any source.
The system, let say you want to develop (create) ten virtual server in your physical server, it is not economic (in term of time saving), if you use manual ways. Setting up virtual server (xen for Open SUSE 11.0) on SLES 11.0 is about ten to fifteen minutes. This is my experience doing this technical works.
So, if you can clone the system, you just copy the template of virtual server and then just adjust the IP address and its name. For xen, this template is located in the /etc/xen/images/
For example;
I already created a virtual server named as MYSVR01_01, and I want to create ten vm's named as MYSVR01_02, MYSVR01_03,.........., MYSVR01_10, MYSVR01_11.
First, to make sure you can fully duplicate the template, you must shutdown the virtual server. If you copy the template while the server is running, you should get the full copy, but at the stage to create virtual machine, you can get an error message: Kernel not found!

Ok, to duplicate this you must login as root into your system (physical system, in this example, my physical system named as MYSVR01). Then insert this command;
cd /etc/xen/images
If you check the current template, it will tell you that MYSVR01_01 already there. And inside MYSVR01_01 there is disk0. The disk0 keep all data needed to built new vm.
Then you can copy disk0 to your vm lists from 02 to 11, by using this command
list='MYSVR01_02 MYSVR01_03 MYSVR01_04 MYSVR01_05 MYSVR01_06 MYSVR01_07 MYSVR01_08 MYSVR01_09 MYSVR01_010 MYSVR01_11'
Then do this command
for i in $list; do cp -r MYSVR01_01 $i done
Then you must wait a moment until disk0 is duplicated in each vm folder.
When the work done, turn to root, by typing
cd /etc
then
cd ..
Insert command
yast2 &
And select, Create Virtual machine.

Then select 'I have a disk or disk image from an installed operating system'

Then click forward, select the OS type.

Click forward, then write your setup for new virtual machine, such as name, memory, and Disk.

Important!
For Disk, please select hardisk, and find the template disk named as disk0 in the directory MYSVR01_02.
Then click OK.
Virtual machine console will be automatically run, and until you reach the login part for that virtual machine.
After signing in, just type command yast. And the blue windows will appear.

Select Network Device and then Network Setting.
Just rename the hostname, IP Address, and other necessary data in this windows.
When you replaced all needed part, you can check the configuration by using this command:
ifconfig
At this stage, the command prompt still remain as the old name, but when you exit (command: exit), the prompt name will be changed to the new name.
Monday, April 6, 2009
Liferay 5.2.2 : How to setup username and password with 'test'.
Why did you failed to sign in as usual (test@liferay.com)?
In Liferay 5.1.2 you can login as test@liferray.com and the default password also 'test'.
For the newest version that is Liferay 5.2.2, the current username is bruno@7cogs.com and password is 'bruno'. However, we can still manipulate this data to login as test@liferay.com and its password as 'test'. How?
First, we must edit file portal-ext.properties (C:\liferay\tomcat\webapps\ROOT\WEB-INF\classes). If the file not exist, just create it by using write editor (example: notepad), and save it as ' portal-ext.properties'. Inside this file, you must put these values.
default.landing.page.path=/web/guest/home
locales=en_US, ms_MY
# the term of language can be set as your own.
locale.default.request=true
theme.css.fast.load=false
javascript.fast.load=false
layout.template.cache.enabled=false
velocity.engine.resource.manager.cache.enabled=false
theme.shortcut.icon=infra.png
company.default.web.id=skali.net
#this id also can be renamed or just keep it as liferay.com. In my case, I will use the domain name as skali.net, but the username and passwoord remain as 'test'.
#after /localhost, you can use any database name. And all data will be populated in your database.
jdbc.default.driverClassName=com.mysql.jdbc.Driver
jdbc.default.url=jdbc:mysql://localhost/liferay?useUnicode=true&characterEncoding=UTF-8&useFastDateParsing=false
#this is the username and pasword to access your mysql database.
jdbc.default.username=root
jdbc.default.password=root
schema.run.enabled=true
schema.run.minimal=true
How to customise your page? That means we dislike to see previous works from 7cogs.
Ok, just remove folder sevencogs-hook in the webapss. (C:\liferay\tomcat\webapps).
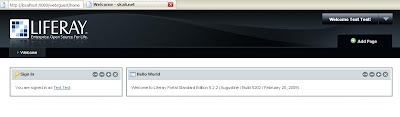
Restart your liferay server. (statrup.bat / startup.sh – depend on your system platform.)
Then your page will be like this. See figure below.
In Liferay 5.1.2 you can login as test@liferray.com and the default password also 'test'.
For the newest version that is Liferay 5.2.2, the current username is bruno@7cogs.com and password is 'bruno'. However, we can still manipulate this data to login as test@liferay.com and its password as 'test'. How?
First, we must edit file portal-ext.properties (C:\liferay\tomcat\webapps\ROOT\WEB-INF\classes). If the file not exist, just create it by using write editor (example: notepad), and save it as ' portal-ext.properties'. Inside this file, you must put these values.
default.landing.page.path=/web/guest/home
locales=en_US, ms_MY
# the term of language can be set as your own.
locale.default.request=true
theme.css.fast.load=false
javascript.fast.load=false
layout.template.cache.enabled=false
velocity.engine.resource.manager.cache.enabled=false
theme.shortcut.icon=infra.png
company.default.web.id=skali.net
#this id also can be renamed or just keep it as liferay.com. In my case, I will use the domain name as skali.net, but the username and passwoord remain as 'test'.
#after /localhost, you can use any database name. And all data will be populated in your database.
jdbc.default.driverClassName=com.mysql.jdbc.Driver
jdbc.default.url=jdbc:mysql://localhost/liferay?useUnicode=true&characterEncoding=UTF-8&useFastDateParsing=false
#this is the username and pasword to access your mysql database.
jdbc.default.username=root
jdbc.default.password=root
schema.run.enabled=true
schema.run.minimal=true
How to customise your page? That means we dislike to see previous works from 7cogs.
Ok, just remove folder sevencogs-hook in the webapss. (C:\liferay\tomcat\webapps).
Restart your liferay server. (statrup.bat / startup.sh – depend on your system platform.)
Then your page will be like this. See figure below.

Still have problem with Sevencog Theme?
Monday, March 9, 2009
Open Source Review
Nowadays people in IT or ICT companies like to talk about Open Source. It is a good practice to use open source software as an alternative to reduce budget. In Malaysia, the phrase of 'Open Source' turned to a popular term when MSC or next to be MSC company impelement it to their operation. There're many reports that support its usage. Open Source Master Plan by MAMPU is the influenced and authenticate party to support this matter. Somehow, there is a 'war' between open source and free software. You can refer this article to understand the scenario.
#-#--#-#-#--#-#-#--#-#-#--#-#-#--#-#-#--#-#-#--#-#-#--#-#-#--#
Most popular open source links are listed below
Wednesday, February 25, 2009
Liferay portlet using Eclipse
How to create liferay portlet using IDE Eclipse? Here the sample and source code.
You can download struts war here and
You can get the current sourcecode for all plugins in SVN, at using any svn client.
Source: Issues Liferay
Subscribe to:
Posts (Atom)


