Problem.
error: ./catalina.sh: 357: not found
Solution: Set the path for JAVA_HOME and JRE_HOME.
First, check java version. Command line: java -version
You will get this: java version "1.6.0_20"
In case java version not equal to the value as in this example, please replace
that according to your java version.
sudo vi catalina.sh
Press key Insert
Just add these two lines.
JAVA_HOME="/usr/lib/jvm/java-sun-6-0.20/bin"
JRE_HOME="/usr/lib/jvm/java-sun-6-0.20/jre"
Then press key Esc
:wq!
Note: :wq! is to quit and save.
Monday, May 24, 2010
Friday, May 21, 2010
Liferay: How to switch language
To localize the language, we configured in portal-ext.properties.
The properties for language is set as shown below.
#limit the language selection.
locales=en_US,ms_MY
I need to create a bilanguage portal. For instance at least a user can choose either to read English or Bahasa or France.
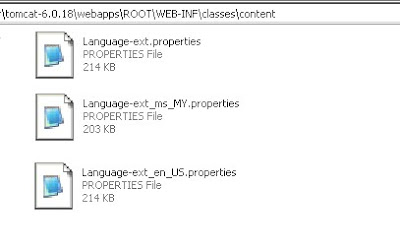
The only file that control language properties is language.properties. For additional terms, we can use Language-ext_en_US.properties and Language-ext_ms_MY.properties. In liferay Community Edition, we can put these files (Language-ext_en_US.properties and Language-ext_ms_MY.properties) in ~/tomcat-6.0.18/webapps/ROOT/WEB-INF/classes/content.
The extend properties depends on languages to be used in portal.
Every places in portal need to be switched will functions as the follows.
1. Journal content will be written using FCK Editor.
2. Theme (template & layout), portlet can be configured in Language-ext_xx_YY.properties files. In my example, xx_YY are en_US and ms_MY.
For the second part above, language's switch identifier generally in this form; #language("any_term_to_change"). Let say we need to apply this to banner. So we write #language("portal.banner"). Then we translate banner term in Language-ext_xx_YY files.

The properties for language is set as shown below.
#limit the language selection.
locales=en_US,ms_MY
I need to create a bilanguage portal. For instance at least a user can choose either to read English or Bahasa or France.
The only file that control language properties is language.properties. For additional terms, we can use Language-ext_en_US.properties and Language-ext_ms_MY.properties. In liferay Community Edition, we can put these files (Language-ext_en_US.properties and Language-ext_ms_MY.properties) in ~/tomcat-6.0.18/webapps/ROOT/WEB-INF/classes/content.

The extend properties depends on languages to be used in portal.
Every places in portal need to be switched will functions as the follows.
1. Journal content will be written using FCK Editor.
2. Theme (template & layout), portlet can be configured in Language-ext_xx_YY.properties files. In my example, xx_YY are en_US and ms_MY.
For the second part above, language's switch identifier generally in this form; #language("any_term_to_change"). Let say we need to apply this to banner. So we write #language("portal.banner"). Then we translate banner term in Language-ext_xx_YY files.

Thursday, May 20, 2010
Liferay: How to add more than one layout?
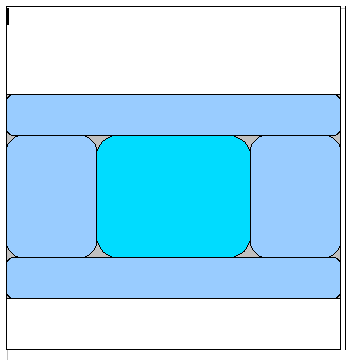
I created template layout using plugIns SDK. Then ant inserted myportal-layouttpl with first layout with 1-3-1 (three rows with three columns for the second row). I renamed this template layout as 'mainpage'.

But for certain page, I need another layout style, let say 1-2 (two rows where the second row has two columns). The second template named as 'subpages'.

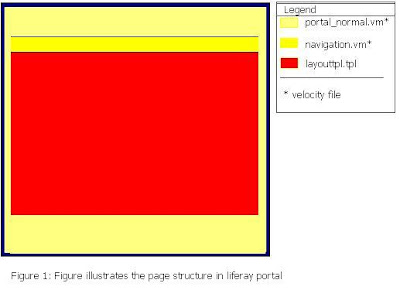
This layout TEMPLATE not included bottom part since footer part already included in portal_normal.vm.
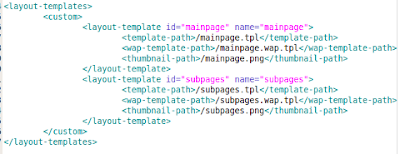
The colored parts in the figure technically written in 1-3-1.tpl (main_page) and 1-2.tpl (subpages). The second layout template can be added like this;
Open liferay-layout-template.xml : Path ~/plugins/layouttpl/myportal-layouttpl/docroot/WEB-INF
Add this before custom tag.

Then do not forget to do ant deploy.

But for certain page, I need another layout style, let say 1-2 (two rows where the second row has two columns). The second template named as 'subpages'.

This layout TEMPLATE not included bottom part since footer part already included in portal_normal.vm.
The colored parts in the figure technically written in 1-3-1.tpl (main_page) and 1-2.tpl (subpages). The second layout template can be added like this;
Open liferay-layout-template.xml : Path ~/plugins/layouttpl/myportal-layouttpl/docroot/WEB-INF
Add this before custom tag.

Then do not forget to do ant deploy.
Liferay: Understanding the theme (Part 2)
4. portlet.vm
This velocity file tell us how a standard portlet would be included in portal. It is inserted through $theme.wrapPortlet("portlet.vm", $content_include)
in portal_normal.vm
To decorate theme, we can customise css. Maybe note on css in previous entry can help for further information.
Now we understand yet template. Inside template, there is layout template. By default, bundle Liferay comes out with classic template.
This layout template can be referred in /tomcat-6.0.18/webapss/ROOT/layouttpl/custom
Wednesday, May 19, 2010
Liferay: Understanding the theme (Part 1).

Liferay 5.2.3
--------------------------
There are a group of velocity files for template named as portal_normal.vm (core file), navigation.vm, dock.vm, init_custom.vm.
1. init_cutom.vm
In this file, we can declare all variables in portal_normal.vm
Example:
#set ($theme_name = "myportal-theme")
#set ($the_title = "Official Web")
#set ($company_name = "MySolution.Net")
#set ($company_url = "http://www.mysolution.net")
2. portal_normal.vm
This is the core / main frame for template. It can accept other velocity files with this form : #parse ("$full_templates_path/any_velocity_file.vm")
Let say we need to include accessibility part which contains functions to personalisation (change color, font size).
So we can write script for it and name the file as accessibilty.vm
To include the file in portal_normal.vm we just add a line likes #parse ("$full_templates_path/accessibility.vm")
3. navigation.vm
The default setting only allow developer develop single page. That means no children page will be passed even if there were children pages added. This is an example script navigation.vm for three layers (main page have three children pages).
Subscribe to:
Comments (Atom)


